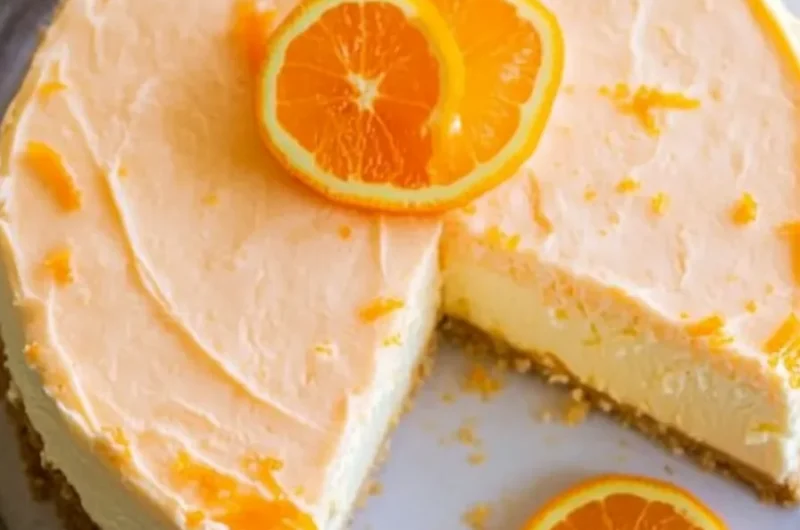
No Bake Orange Creamsicle Cheesecake is an amazing twist on the classic dessert that will transport your taste buds to a sunny, blissful day. This light and creamy cheesecake embodies the delightful flavors of oranges and vanilla, reminiscent of childhood ice cream treats. The best part? There’s no baking required, making it a simple yet indulgent dessert for any occasion. Whether you’re hosting a summer barbecue or simply enjoying a sweet treat at home, this recipe will leave you and your guests in awe.
Imagine indulging in a slice of this velvety cheesecake, topped with a luscious orange glaze and garnished with whipped cream. The combination of the rich cream cheese and the citrusy zest creates a perfectly balanced dessert. Not only is this cheesecake delicious, but it is also incredibly easy to prepare. With no need for an oven, you can whip this up and refrigerate it for a few hours, allowing you to focus on enjoying your day.
In this article, we’ll explore why this No Bake Orange Creamsicle Cheesecake is a must-try. We’ll cover everything from the preparation and cooking time to the ingredients, detailed step-by-step instructions, and tips on how to serve this delightful dessert. Get ready to impress your family and friends with this incredible sweet treat!
Why You’ll Love This Recipe
No Bake Orange Creamsicle Cheesecake offers an array of benefits that make it irresistible. Here’s why this dessert deserves a spot in your recipe collection:
1. No Baking Required – Perfect for hot days, as you won’t need to turn on the oven.
2. Simple Ingredients – Most ingredients are readily available in your pantry or local grocery store.
3. Versatile Flavor – The blend of orange and vanilla works perfectly for various occasions.
4. Quick and Easy – Preparation is fast, making it an ideal dessert when you’re short on time.
5. Visually Stunning – The vibrant colors make it attractive, perfect for gatherings or special events.
6. Light Yet Satisfying – Despite being a cheesecake, it feels fresh and airy, making it a delightful treat.
These reasons will surely make you fall in love with this recipe. Each slice of No Bake Orange Creamsicle Cheesecake is a delightful experience, providing both comfort and joy!
Preparation and Cooking Time
Creating your No Bake Orange Creamsicle Cheesecake typically takes about 30 minutes of preparation time. The cheesecake will then need to set in the refrigerator for at least 4 hours before serving. Here’s a quick breakdown:
– Preparation Time: 30 minutes
– Refrigeration Time: 4 hours (or overnight for the best results)
This simple timing makes this recipe perfect for last-minute gatherings or planned events!
Ingredients
For the No Bake Orange Creamsicle Cheesecake, you will need the following ingredients:
For the Crust:
– 1 ½ cups graham cracker crumbs
– ⅓ cup granulated sugar
– ½ cup unsalted butter, melted
For the Filling:
– 16 ounces cream cheese, softened
– 1 cup powdered sugar
– 1 teaspoon vanilla extract
– ¾ cup heavy whipping cream
– Zest of 1 large orange
– ½ cup fresh orange juice
For the Topping:
– 1 cup heavy whipping cream
– 2 tablespoons powdered sugar
– Orange slices or zest for garnish (optional)
Step-by-Step Instructions
Follow these simple steps to create your No Bake Orange Creamsicle Cheesecake:
1. Prepare the Crust: In a medium mixing bowl, combine the graham cracker crumbs, granulated sugar, and melted butter. Mix until well combined.
2. Form the Crust: Press the mixture firmly into the bottom of a 9-inch springform pan. Use the back of a measuring cup to ensure it’s compact and even. Set aside.
3. Make the Filling: In a large bowl, beat the softened cream cheese with an electric mixer until smooth. Gradually add the powdered sugar and continue mixing until well incorporated.
4. Add Flavor: Mix in the vanilla extract, orange zest, and fresh orange juice. Beat until everything is well combined and creamy.
5. Whip the Cream: In a separate bowl, whip the heavy cream until soft peaks form. Then, gently fold the whipped cream into the cream cheese mixture until fully combined.
6. Assemble the Cheesecake: Pour the cream cheese filling over the prepared crust, smoothing the top with a spatula.
7. Chill: Cover with plastic wrap and refrigerate for at least 4 hours or overnight for the best consistency.
8. Prepare the Topping: Before serving, whip the heavy cream with powdered sugar until stiff peaks form. Spread or pipe this whipped cream over the top of the cheesecake for a beautiful finish.
9. Garnish: Optionally, top with fresh orange slices or additional orange zest for an extra touch of elegance.
How to Serve
Serving No Bake Orange Creamsicle Cheesecake can elevate the dessert experience for your guests. Here are some tips to make it even more enjoyable:
1. Presentation: Use a cake stand or dessert plate to showcase the cheesecake beautifully. A garnish of orange slices can enhance the visual appeal.
2. Slice Size: Serve generous, yet moderate slices. This encourages guests to go back for seconds without overwhelming them.
3. Pairing: Complement the cheesecake with a refreshing drink, such as iced tea or lemonade, for a delightful balance of flavors.
4. Personal Touch: Consider adding a drizzle of chocolate or a spritz of additional orange juice on the plates for added flavor and decoration.
5. Chill Before Serving: Ensure the cheesecake is well-chilled for a refreshing taste that is particularly desired in warmer months.
By incorporating these serving tips, you’ll elevate the experience and create a memorable gathering around your No Bake Orange Creamsicle Cheesecake!
Additional Tips
– Use Fresh Ingredients: Utilize fresh oranges for juice and zest for the best flavor. Fresher ingredients enhance the overall taste of your No Bake Orange Creamsicle Cheesecake.
– Let it Chill: Allowing the cheesecake to set overnight creates a firmer texture. If you have the time, opt for this method for the best results.
– Decorate Creatively: Consider adding edible flowers or mint leaves alongside the orange slices for a pop of color and freshness.
– Experiment with Extracts: You can try different extracts, such as almond or coconut, to add a unique twist to the flavor profile of your cheesecake.
Recipe Variation
Feel free to get creative with this recipe! Here are some variations to consider:
1. Chocolate Twist: Incorporate a layer of melted dark chocolate within the cheesecake filling, creating a delightful chocolate-orange fusion.
2. Citrus Mix: Combine orange juice with other citrus juices, such as lemon or lime, for a more complex flavor.
3. Oreo Crust: Substitute the graham cracker crust with crushed Oreo cookies for a chocolate-savory hint that pairs well with the orange.
4. Mini Cheesecakes: Instead of a large cheesecake, create mini versions in cupcake liners for individual servings, perfect for parties!
Freezing and Storage
– Storage: Keep your No Bake Orange Creamsicle Cheesecake covered in the refrigerator. It will stay fresh for up to 5 days.
– Freezing: You can freeze the cheesecake for longer storage. Wrap individual slices tightly in plastic wrap and then place them in an airtight container. This way, it can last up to 3 months in the freezer.
– Thawing: When ready to enjoy, simply transfer a slice from the freezer to the refrigerator a few hours before serving, allowing it to thaw gradually.
Special Equipment
While this cheesecake is straightforward to make, having the right tools makes the process smoother:
– Mixing Bowls: A large bowl for the filling and a smaller bowl for whipping cream will be helpful.
– Electric Mixer: A hand or stand mixer makes it easy to achieve a smooth filling and whipped cream.
– Spatula: A silicone spatula is essential for folding the whipped cream gently into the cheesecake filling and for smoothing the top.
– Springform Pan: A 9-inch springform pan allows for easy removal of the cheesecake once it’s set, providing a clean presentation.
Frequently Asked Questions
Can I use low-fat cream cheese?
Certainly! Low-fat cream cheese can be used, but it may alter the creaminess of the cheesecake slightly.
How do I know when the cheesecake is ready to serve?
The cheesecake should be set and firm to the touch. If it still has a jiggle in the center, give it more time in the refrigerator.
Is there an alternative sweetener I can use?
Yes! You can substitute granulated sugar with alternatives like Stevia or agave nectar, but be sure to follow the equivalent measurements for the best results.
Can I make this cheesecake vegan?
Of course! Use vegan cream cheese and coconut cream in place of regular cream cheese and heavy whipping cream.
What if I don’t have a springform pan?
You can use a regular pie dish instead. Just be cautious when slicing, as the cheesecake might be more challenging to remove.
Conclusion
The No Bake Orange Creamsicle Cheesecake is a refreshing and delightful treat that’s perfect for any gathering or a sweet indulgence at home. With its creamy texture, vibrant orange flavor, and simple preparation process, this dessert is sure to impress. It beautifully balances flavors while providing a nostalgic, summery experience. Sweeten your occasions with this recipe that brings joy in every bite!

No Bake Orange Creamsicle Cheesecake: An Incredible Ultimate Dessert Recipe
- Total Time: 58 minute
Ingredients
For the No Bake Orange Creamsicle Cheesecake, you will need the following ingredients:
Instructions
Follow these simple steps to create your No Bake Orange Creamsicle Cheesecake:
1. Prepare the Crust: In a medium mixing bowl, combine the graham cracker crumbs, granulated sugar, and melted butter. Mix until well combined.
2. Form the Crust: Press the mixture firmly into the bottom of a 9-inch springform pan. Use the back of a measuring cup to ensure it’s compact and even. Set aside.
3. Make the Filling: In a large bowl, beat the softened cream cheese with an electric mixer until smooth. Gradually add the powdered sugar and continue mixing until well incorporated.
4. Add Flavor: Mix in the vanilla extract, orange zest, and fresh orange juice. Beat until everything is well combined and creamy.
5. Whip the Cream: In a separate bowl, whip the heavy cream until soft peaks form. Then, gently fold the whipped cream into the cream cheese mixture until fully combined.
6. Assemble the Cheesecake: Pour the cream cheese filling over the prepared crust, smoothing the top with a spatula.
7. Chill: Cover with plastic wrap and refrigerate for at least 4 hours or overnight for the best consistency.
8. Prepare the Topping: Before serving, whip the heavy cream with powdered sugar until stiff peaks form. Spread or pipe this whipped cream over the top of the cheesecake for a beautiful finish.
9. Garnish: Optionally, top with fresh orange slices or additional orange zest for an extra touch of elegance.
- Prep Time: 15 minutes
- Cook Time: No Cook
Nutrition
- Serving Size: 10 slices
- Calories: 320 kcal
- Fat: 20g
- Protein: 3g