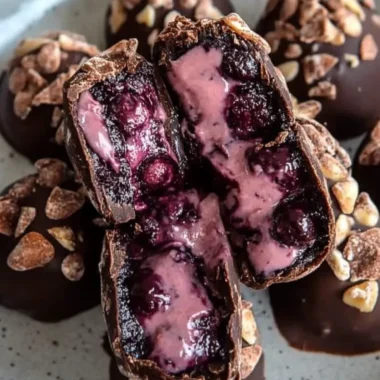
Homemade Choco Tacos are an incredible treat that combines two beloved favorites: ice cream and chocolate tacos. This dessert is a delightful fusion that can transport you back to childhood summers and joyful memories with every bite. The crunchy taco shell enveloped in sweet chocolate, filled with creamy ice cream, creates a harmonious balance of textures and flavors.
If you’ve ever savored a Choco Taco from an ice cream truck, you might be wondering how you can recreate that amazing experience at home. Fortunately, this homemade version is easy to make, using readily available ingredients that will delight your family and friends. Making these indulgent delights can also be a fun activity to engage in together, creating sweet memories while enjoying delicious treats.
In this guide, we’ll explore everything you need to know about making your own Homemade Choco Tacos. You’ll learn why this recipe is fantastic, how to prepare it, and the best ways to serve these delightful desserts. Ready to dive into a world of sweetness? Let’s get started!
Why You’ll Love This Recipe
Homemade Choco Tacos bring joy to any occasion. They are not only tasty; they are also visually appealing and customizable to suit individual preferences. Here are some reasons why you’ll absolutely adore this recipe:
1. Customizable Flavors: You can choose your favorite ice cream flavors and toppings, making each taco unique.
2. Easy to Make: With straightforward instructions, even novice cooks can successfully whip up these treats.
3. Fun Presentation: The unique taco shape adds an element of fun that will impress guests at any gathering.
4. Great for Parties: These choco tacos are perfect for birthday parties, barbecues, or just a fun family dessert night.
5. Delicious Combination: The crispy taco shell paired with creamy ice cream satisfies any sweet tooth.
6. Nostalgic Treat: Enjoying a homemade version evokes memories of childhood summer days spent chasing ice cream trucks.
With such delightful aspects, it’s easy to see why this recipe is a hit for families and friends alike. Homemade Choco Tacos will undoubtedly bring a smile to everyone’s face!
Preparation and Cooking Time
Preparing your Homemade Choco Tacos is a breeze. Here’s an overview of the time required for each step involved in the process:
– Preparation Time: 30 minutes
– Freezing Time: 2 hours (for the ice cream filling)
– Cooking Time: 15 minutes (for the taco shells)
Overall, plan on about 2 hours and 45 minutes from start to finish, but most of this time is passive freezing time.
Ingredients
– 1 cup all-purpose flour
– ¼ cup granulated sugar
– 1/4 teaspoon salt
– 2 tablespoons unsweetened cocoa powder
– 3 tablespoons unsalted butter, melted
– 1 large egg
– 1/4 teaspoon baking powder
– 1/2 teaspoon vanilla extract
– 1 cup ice cream (any flavor of your choice)
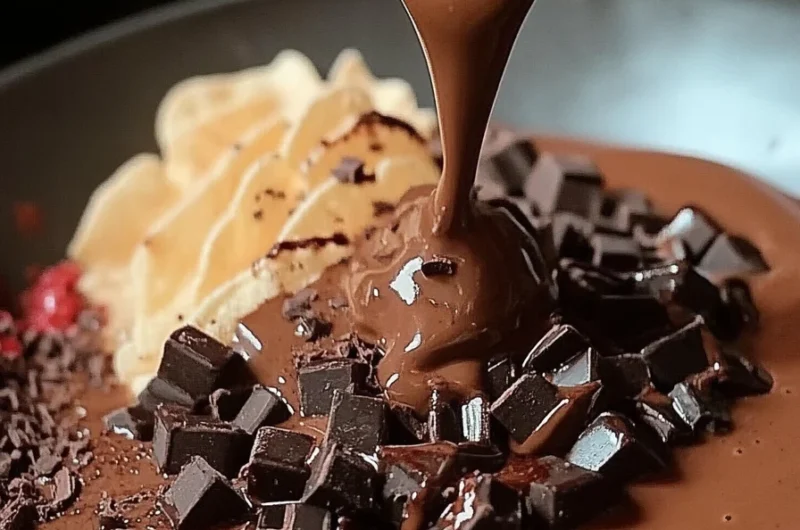
– 1 cup semi-sweet chocolate chips
– 1 tablespoon coconut oil (optional, for dipping)
– Toppings: rainbow sprinkles, chopped nuts, whipped cream (optional)
Step-by-Step Instructions
Creating delicious Homemade Choco Tacos is simple if you follow these steps carefully:
1. Make the Taco Shells:
a. In a mixing bowl, combine the flour, sugar, salt, cocoa powder, and baking powder.
b. In another bowl, whisk together the melted butter, egg, and vanilla extract.
c. Pour the wet ingredients into the dry ingredients and mix until a dough forms.
d. Divide the dough into small balls (about 2 tablespoons each) and flatten them into circles.
2. Cook the Taco Shells:
a. Preheat a skillet or griddle over medium heat.
b. Spray the skillet lightly with cooking spray or oil.
c. Place one flattened circle of dough on the skillet and cook for about 2-3 minutes on each side, or until set but still pliable.
d. While the shell is still warm, gently drape it over an oven-safe bowl to create the taco shape and let it cool.
e. Repeat the process until all the dough is used.
3. Prepare the Ice Cream Filling:
a. Scoop your chosen ice cream into a bowl and let it soften slightly at room temperature.
b. Once softened, scoop a generous amount into each taco shell, packing it in well.
c. Place the filled tacos in the freezer for about 2 hours to set.
4. Coat the Tacos:
a. Melt the chocolate chips with the coconut oil in a microwave-safe bowl, heating in short intervals and stirring until smooth.
b. Remove the tacos from the freezer and dip the edges of each taco into the melted chocolate, allowing excess to drip off.
c. Place the dipped tacos on a parchment-lined baking sheet.
5. Add Toppings:
a. Before the chocolate hardens, sprinkle your desired toppings over the melted chocolate.
b. Place the baking sheet back in the freezer for an additional 30 minutes to set the chocolate.
How to Serve
Serving your Homemade Choco Tacos is all about presentation and enjoyment. Here are a few tips to make the experience memorable:
1. Create a Fun Display: Present the tacos on a colorful platter or a taco holder. Arrange them in a row for an appealing setup.
2. Offer a Selection of Toppings: Provide extra toppings like sprinkles, whipped cream, and nuts for guests to personalize their tacos.
3. Pair with Beverages: Consider serving the tacos with milkshakes or flavored sodas to enhance the dessert experience.
4. Serve Immediately: For the best texture, enjoy these tasty treats right after dipping them in chocolate.
With these serving tips, your Homemade Choco Tacos will stand out as not only a delicious treat but also a delightful culinary adventure that’s sure to impress!
Additional Tips
– Use Quality Ingredients: For the best flavor, opt for high-quality cocoa powder and semi-sweet chocolate chips. It makes a noticeable difference in taste.
– Make Even Taco Shells: To ensure uniformity, roll the dough balls to the same size before flattening them into circles.
– Experiment with Chocolate: Try adding flavored chocolate, like mint or orange, for a unique twist.
– Creative Toppings: In addition to sprinkles and nuts, consider using crushed candy or chocolate sauce for extra indulgence.
– Enjoy While Cold: For the best ice cream experience, serve the tacos straight from the freezer.
Recipe Variation
Feel free to switch things up! Here are a few variations to try:
1. Unique Ice Cream Flavors: Experiment with non-traditional ice cream flavors like pistachio, coffee, or even cheesecake.
2. Gluten-Free Options: Substitute all-purpose flour with a gluten-free flour blend to make these choco tacos suitable for gluten-sensitive individuals.
3. Healthier Alternatives: Use yogurt or dairy-free ice cream for a lighter version of this treat without losing the delicious taste.
4. Nutty Delight: Add crushed almonds, walnuts, or peanuts into the ice cream filling for added texture and flavor.
Freezing and Storage
– Storage: Keep your Homemade Choco Tacos stored in an airtight container in the freezer. They will retain their best quality for up to 2 weeks.
– Freezing: If you have leftovers, individually wrap the tacos in plastic wrap or aluminum foil before placing them in a freezer-safe bag to avoid freezer burn.
Special Equipment
You will need a few essential tools to prepare this delightful dessert successfully:
– Mixing bowls for combining ingredients.
– A skillet or griddle for cooking the taco shells.
– Parchment paper for the baking sheet to prevent sticking.
– A microwave-safe bowl for melting chocolate.
– An oven-safe bowl to shape the taco shells.
Frequently Asked Questions
Can I use store-bought ice cream?
Yes, using store-bought ice cream is a great option for convenience. Just make sure to soften it slightly before filling the taco shells.
What can I do if my taco shells break?
If the taco shells break, simply reshape them while they’re warm. You can also use a flat surface to press them into shape again.
How do I prevent the taco shells from sticking?
Using a non-stick skillet or lightly greasing the cooking surface can prevent the shells from sticking and ensure a smooth cooking process.
Can I make the taco shells ahead of time?
Certainly! You can prepare the taco shells in advance. Store them in an airtight container at room temperature until you’re ready to fill with ice cream.
What other toppings can I try?
Consider caramel sauce, coconut flakes, mini chocolate chips, or even fresh fruits like bananas and strawberries for a delightful topping experience.
Conclusion
Homemade Choco Tacos are not just a dessert; they are a fun and nostalgic treat that can elevate any gathering. Their combination of crispy taco shells, smooth ice cream, and rich chocolate coating creates a snack everyone loves. With a bit of creativity in the kitchen, you can personalize and perfect these delightful tacos to make them uniquely yours. Enjoy the process of creating these delightful goodies and the joy they bring when shared with family and friends!
Homemade Choco Tacos: An Amazing Ultimate Recipe for All
- Total Time: 30 minutes
Ingredients
– 1 cup all-purpose flour
– ¼ cup granulated sugar
– 1/4 teaspoon salt
– 2 tablespoons unsweetened cocoa powder
– 3 tablespoons unsalted butter, melted
– 1 large egg
– 1/4 teaspoon baking powder
– 1/2 teaspoon vanilla extract
– 1 cup ice cream (any flavor of your choice)
– 1 cup semi-sweet chocolate chips
– 1 tablespoon coconut oil (optional, for dipping)
– Toppings: rainbow sprinkles, chopped nuts, whipped cream (optional)
Instructions
Creating delicious Homemade Choco Tacos is simple if you follow these steps carefully:
1. Make the Taco Shells:
a. In a mixing bowl, combine the flour, sugar, salt, cocoa powder, and baking powder.
b. In another bowl, whisk together the melted butter, egg, and vanilla extract.
c. Pour the wet ingredients into the dry ingredients and mix until a dough forms.
d. Divide the dough into small balls (about 2 tablespoons each) and flatten them into circles.
2. Cook the Taco Shells:
a. Preheat a skillet or griddle over medium heat.
b. Spray the skillet lightly with cooking spray or oil.
c. Place one flattened circle of dough on the skillet and cook for about 2-3 minutes on each side, or until set but still pliable.
d. While the shell is still warm, gently drape it over an oven-safe bowl to create the taco shape and let it cool.
e. Repeat the process until all the dough is used.
3. Prepare the Ice Cream Filling:
a. Scoop your chosen ice cream into a bowl and let it soften slightly at room temperature.
b. Once softened, scoop a generous amount into each taco shell, packing it in well.
c. Place the filled tacos in the freezer for about 2 hours to set.
4. Coat the Tacos:
a. Melt the chocolate chips with the coconut oil in a microwave-safe bowl, heating in short intervals and stirring until smooth.
b. Remove the tacos from the freezer and dip the edges of each taco into the melted chocolate, allowing excess to drip off.
c. Place the dipped tacos on a parchment-lined baking sheet.
5. Add Toppings:
a. Before the chocolate hardens, sprinkle your desired toppings over the melted chocolate.
b. Place the baking sheet back in the freezer for an additional 30 minutes to set the chocolate.
- Prep Time: 15 minutes
- Cook Time: 15 minutes
Nutrition
- Serving Size: 4 tacos
- Calories: 360 kcal
- Fat: 18g
- Protein: 5g