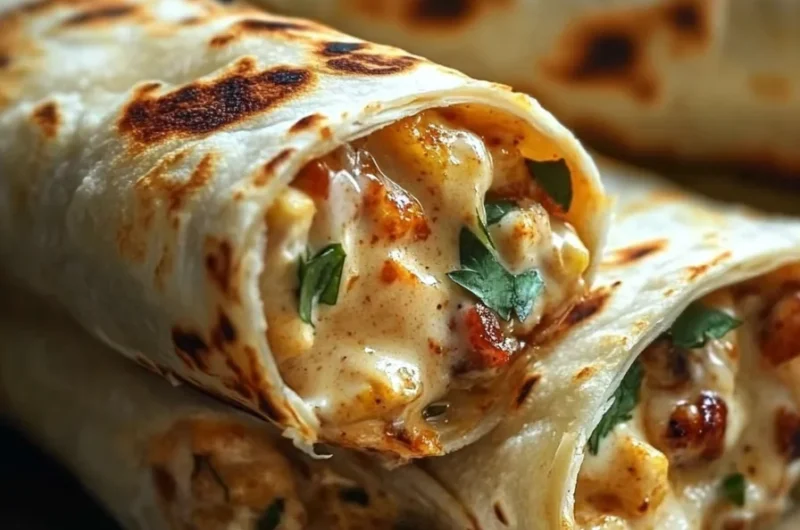
Cheesy Garlic Chicken Wraps are an amazing way to bring flavor and satisfaction to your family meals. This delightful dish combines tender chicken, gooey cheese, and aromatic garlic, all wrapped up in a warm tortilla. Each bite is a culinary treat that promises to leave you craving more. Whether you’re looking for a quick dinner option or a satisfying lunch, these wraps are versatile enough to suit any occasion.
Imagine coming home after a long day to the enticing aroma of cheesy garlic chicken wafting through your kitchen. It’s a comforting blend that signals family time, shared laughter, and delicious food. Best of all, this recipe requires only a handful of ingredients, making it simple yet incredible. In this guide, you’ll discover why Cheesy Garlic Chicken Wraps are the perfect go-to recipe for busy nights, how to make them, and tips on serving them effectively.
From the first mouthful, you’ll find that the combination of melted cheese with savory garlic and juicy chicken creates a flavor explosion. It’s a meal that will not only fill you up but also nourish your spirit. Let’s dive into the details and explore what makes Cheesy Garlic Chicken Wraps a must-try recipe!
Why You’ll Love This Recipe
There are several reasons why Cheesy Garlic Chicken Wraps will quickly become a favorite at your dinner table:
1. Quick and Easy Preparation: With only five ingredients, you’ll find this recipe is straightforward and quick, taking less than 30 minutes from start to finish.
2. Flavorful Ingredients: The combination of garlic and cheese enhances the chicken, creating a mouthwatering experience that will leave everyone asking for more.
3. Customizable Fillings: While this recipe focuses on chicken, you can easily swap in your favorite proteins or add extra veggies for added crunch and nutrition.
4. Kid-Friendly: The cheesy nature of this dish makes it appealing to kids and adults alike, making dinner a breeze.
5. Perfect for Meal Prep: These wraps can be made ahead of time, stored in the fridge, and reheated for a quick meal throughout the week.
6. Versatile Serving Options: Serve them as-is or with your favorite sides like salads, soups, or dipping sauces.
With all these advantages, it’s clear why Cheesy Garlic Chicken Wraps are a fantastic choice for your next meal!
Preparation and Cooking Time
Making Cheesy Garlic Chicken Wraps is a quick and efficient process. Here’s a breakdown of the time required:
– Preparation Time: 10 minutes
– Cooking Time: 15 minutes
– Total Time: 25 minutes
This time-efficient recipe is perfect for busy weeknights when you need something delicious on the table without the hassle.
Ingredients
– 2 large chicken breasts
– 1 cup shredded mozzarella cheese
– 2 tablespoons minced garlic
– 4 large tortillas
– 2 tablespoons olive oil
Step-by-Step Instructions
Creating Cheesy Garlic Chicken Wraps is simple and rewarding. Just follow these easy steps:
1. Prepare the Chicken: Start by cutting the chicken breasts into thin strips. This will help them cook faster and ensure they’re tender.
2. Heat the Oil: In a skillet, heat the olive oil over medium-high heat. This will add flavor to the chicken.
3. Cook the Chicken: Add the chicken strips to the skillet. Sauté for about 5-7 minutes, or until they are cooked through and no longer pink in the center.
4. Add Garlic: Sprinkle the minced garlic over the cooked chicken and stir well. Cook for an additional 2 minutes until the garlic becomes fragrant.
5. Melt the Cheese: Sprinkle the shredded mozzarella cheese over the chicken and cover the skillet with a lid. Allow the cheese to melt for about 2-3 minutes.
6. Assemble the Wraps: Lay out the tortillas on a clean surface. Divide the cheesy chicken mixture evenly among the tortillas.
7. Wrap It Up: Fold the sides of the tortilla in, then roll from the bottom up to create a tight wrap. Secure with a toothpick if necessary.
8. Toast the Wraps (Optional): For added crispiness, heat a non-stick skillet over medium heat and toast the wraps for 2-3 minutes on each side until golden brown.
9. Slice and Serve: Once toasted, remove the wraps from the stove and cut them in half for easier handling.
With these straightforward instructions, you’ll have Cheesy Garlic Chicken Wraps ready in no time!
How to Serve
To make your Cheesy Garlic Chicken Wraps even more enjoyable, consider these serving suggestions:
1. Dipping Sauces: Serve with ranch dressing, marinara sauce, or a zesty salsa for added flavor and fun.
2. Fresh Sides: Pair the wraps with a side salad, coleslaw, or even crispy fries for a complete meal that satisfies all cravings.
3. Garnish: Sprinkle some chopped fresh herbs like parsley or cilantro on top for a pop of color and flavor.
4. Individual Portions: Cut the wraps into bite-sized pieces for an appetizer-style presentation that’s perfect for gatherings or parties.
By following these serving suggestions, you can elevate the experience of your Cheesy Garlic Chicken Wraps, making them memorable for both you and your guests. Enjoy every bite of this incredible dish!
Additional Tips
– Use Fresh Ingredients: Fresh chicken and garlic enhance the flavor of your Cheesy Garlic Chicken Wraps. Visit a local market for the best quality.
– Experiment with Spices: Add paprika, cumin, or chili powder to the chicken while cooking for an extra layer of flavor.
– Serve Immediately: These wraps taste best right after they’re made, so serve them hot for the ultimate cheesy experience.
– Make It a Meal: Add some greens like spinach or arugula to your wraps for added nutrition and freshness.
Recipe Variation
There are so many ways to enjoy Cheesy Garlic Chicken Wraps. Here are a few creative variations to try:
1. Spicy Chicken Wraps: Incorporate jalapeños or hot sauce into the chicken mixture for a kick of heat.
2. Add Some Veggies: Include bell peppers, onions, or mushrooms for added texture and flavor.
3. Different Cheeses: Swap mozzarella for cheddar, pepper jack, or feta to create unique flavor combinations.
4. Bacon Lovers: Add cooked crumbled bacon to the filling for a smoky, savory twist.
Freezing and Storage
To keep your Cheesy Garlic Chicken Wraps fresh and flavorful, consider the following storage tips:
– Storage: Keep the wraps in an airtight container in the refrigerator for up to 3 days. This helps maintain their texture and taste.
– Freezing: You can freeze uncooked or cooked wraps. Wrap them tightly in plastic wrap and place them in a freezer bag for up to 3 months. Simply thaw and reheat when ready to enjoy.
Special Equipment
Preparing Cheesy Garlic Chicken Wraps requires only basic kitchen tools, such as:
– A sharp knife for cutting chicken and vegetables
– A skillet for cooking the chicken
– A spatula or wooden spoon for stirring
– A cutting board for assembly
Frequently Asked Questions
Can I use leftover chicken?
Absolutely! Leftover rotisserie chicken works beautifully in this recipe. Just shred it and add it to the skillet with the garlic and cheese.
What can I serve with the wraps?
These wraps pair well with fresh salads, crispy fries, or roasted vegetables. You can also offer a variety of dipping sauces.
Can I make these wraps gluten-free?
Yes, simply switch out the standard tortillas for gluten-free ones. They’ll still taste fantastic!
How do I make them more substantial?
Add an extra layer of fillings like beans, rice, or quinoa to make the wraps heartier and more filling.
Can I cook these wraps in the oven?
Yes! Once assembled, place the wraps on a baking sheet and bake at 350°F (175°C) for about 10-15 minutes until heated through and golden brown.
Conclusion
Cheesy Garlic Chicken Wraps are not just a meal; they are an experience that brings joy to the table. Simplistic yet flavorful, this five-ingredient recipe promises to delight your taste buds and create cherished family memories. Their convenience, versatility, and crowd-pleasing nature make them perfect for lazy weekends or busy weeknights. So gather your loved ones and indulge in these delightful wraps today. You won’t regret it!

Cheesy Garlic Chicken Wraps: An Incredible 5-Ingredient Recipe
- Total Time: 30 minutes
Ingredients
– 2 large chicken breasts
– 1 cup shredded mozzarella cheese
– 2 tablespoons minced garlic
– 4 large tortillas
– 2 tablespoons olive oil
Instructions
Creating Cheesy Garlic Chicken Wraps is simple and rewarding. Just follow these easy steps:
1. Prepare the Chicken: Start by cutting the chicken breasts into thin strips. This will help them cook faster and ensure they’re tender.
2. Heat the Oil: In a skillet, heat the olive oil over medium-high heat. This will add flavor to the chicken.
3. Cook the Chicken: Add the chicken strips to the skillet. Sauté for about 5-7 minutes, or until they are cooked through and no longer pink in the center.
4. Add Garlic: Sprinkle the minced garlic over the cooked chicken and stir well. Cook for an additional 2 minutes until the garlic becomes fragrant.
5. Melt the Cheese: Sprinkle the shredded mozzarella cheese over the chicken and cover the skillet with a lid. Allow the cheese to melt for about 2-3 minutes.
6. Assemble the Wraps: Lay out the tortillas on a clean surface. Divide the cheesy chicken mixture evenly among the tortillas.
7. Wrap It Up: Fold the sides of the tortilla in, then roll from the bottom up to create a tight wrap. Secure with a toothpick if necessary.
8. Toast the Wraps (Optional): For added crispiness, heat a non-stick skillet over medium heat and toast the wraps for 2-3 minutes on each side until golden brown.
9. Slice and Serve: Once toasted, remove the wraps from the stove and cut them in half for easier handling.
With these straightforward instructions, you’ll have Cheesy Garlic Chicken Wraps ready in no time!
- Prep Time: 15 minutes
- Cook Time: 15 minutes
Nutrition
- Serving Size: 4 wraps
- Calories: 400 kcal
- Fat: 20g
- Protein: 35g


